Year 4 Science · AC9S4I03

Observing, Measuring and Recording

Read the evidence, show your working and explain what the record can tell us.

Ready to project and teach

Learning goalsSay it simply

Follow an ordered procedure to observe, measure and record accurately. Choose familiar scaled instruments or digital tools for the evidence needed, read their intervals and keep useful records.

Success looks like

  • I record what I actually see, hear or measure and distinguish a possible identification from an observation.
  • I identify the quantity, unit and size of each scale interval before reading.
  • I round up or down as instructed and explain what a coarse scale can show.
  • I construct a labelled table or organiser and keep observations attached to the correct sample and time.
Clean visual examplesOne-page board

Read, record and check formal measurements

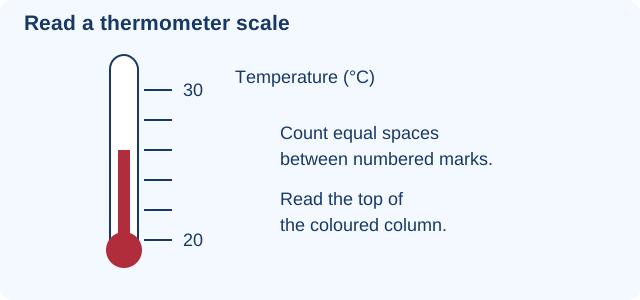
Thermometer labelled 20 and 30 degrees Celsius with five equal spaces. Coloured column reaches the third small step above 20.
Original classroom model; use the labels and scale shown.
  1. Read the unit: temperature is in degrees Celsius.
  2. The labelled difference is 30 − 20 = 10°C. Five equal spaces make each interval 2°C.
  3. The coloured column is three spaces above 20°C: 22, 24, 26. Record 26°C.
  4. Add the time and sample name to the record; check the probe or thermometer placement before accepting the value.

Teacher asks: Why is counting three spaces not a reading of 23°C? Expected: Each space is worth two degrees, not one. If incorrect, count the labelled difference into five equal jumps.

Choose instruments and digital tools by purpose

Quantity or evidenceSuitable toolRecording detail
lengthruler or tapezero/start point; mm or cm
massbalancezero/tare; g or kg
liquid volumemarked jug or cylinderlevel container; mL or L
temperaturethermometer or probecorrect placement; °C
durationtimerstart/stop events; s or min
appearance or motioncamera or videodate, subject and consistent view
animal callaudio recordertime, location and reference used

Digital tools can preserve observations and help with repeated recording. They still need correct placement, labels, units and sensible checks. A photo without a usable scale cannot supply an exact length.

Round a reading and account for the starting point

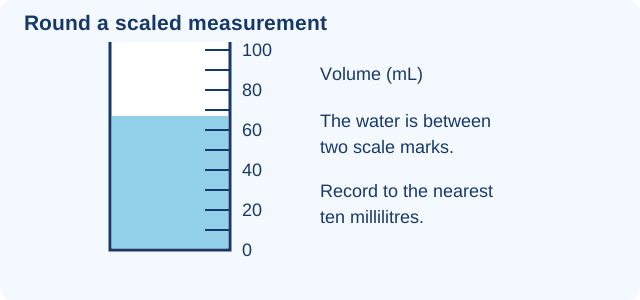
Measuring container marked every ten millilitres, with labels zero, twenty, forty, sixty, eighty and one hundred. Water level is between sixty and seventy, closer to seventy.
Original classroom model; use the labels and scale shown.

The container has 10 mL divisions. The level is between 60 and 70 mL, closer to 70. To the nearest 10 mL, record about 70 mL. A value nearer 60 would round down to about 60 mL. Follow the stated rounding instruction; when exactly halfway, the usual school convention rounds up.

Smaller divisions can show a finer difference when used carefully. They do not guarantee accuracy: a tilted jug or badly placed probe can still give a poor reading. Do not write extra decimal places that the scale does not support.

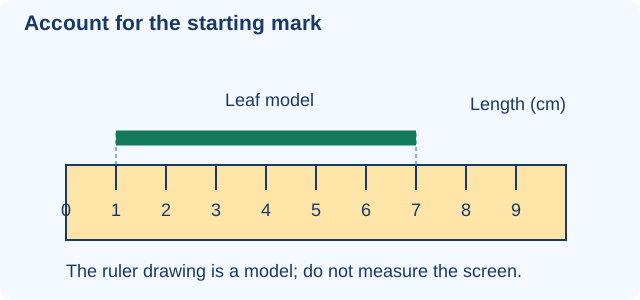
A leaf model begins at the one centimetre mark and ends at the seven centimetre mark on a ruler with equal one-centimetre intervals.
Original classroom model; use the labels and scale shown.

The leaf begins at 1 cm and ends at 7 cm. Its length is 7 − 1 = 6 cm. Normally align the object with zero; if the start is different, subtract it.

Curriculum examplesCopied content

Content description: follow procedures to make and record observations, including making formal measurements using familiar scaled instruments and using digital tools as appropriate

E1: identifying animals in field locations using procedures such as direct or virtual observation, call or scat identification or pitfall traps

Use a fixed-place, timed wildlife watch or a teacher-selected wildlife-camera clip. Record the source, date/time, location and features seen or heard. Compare calls or teacher-provided scat photographs with a suitable guide, retaining “possible” when features are not unique. Explain that scientists may use pitfall traps to sample some ground-moving animals; this does not count all animals. Students do not handle scat, disturb wildlife or set traps.

Modelled example: A repeated call is heard but the bird is hidden. Record “heard a repeated call; possible species A from the reference”, not “saw A” or “three calls means three birds”.

E2: using appropriate equipment to make and record observations, such as digital cameras, video, voice recorders and familiar scaled instruments with appropriate increments

Match the tool to the evidence, using the table above. Measure a safe object with a ruler, view fast movement with replayable video or compare calls with audio. Label each record and use consistent views or timing. Check zero, placement and units where appropriate.

Modelled example: To track a seedling, use dated photographs for appearance and a ruler for height. A camera alone does not directly measure mass or supply length without a scale.

E3: describing how to use rounding up or down when reading scaled instruments, and the effect of the scale size on the accuracy of the measurement

Work through the jug and ruler models above. Practise readings nearer the lower mark and nearer the upper mark, clearly stating the required nearest unit. Compare 1 cm and 1 mm divisions on familiar rulers; finer marks support finer readings when setup is correct.

Modelled example: A point between 42 and 43 mm, nearer 42, rounds down to about 42 mm. A point between 6 and 7 cm, nearer 7, rounds up to about 7 cm. Keep units and avoid invented precision.

E4: constructing tables or graphic organisers to record observations

Before observing, construct headings for sample/animal, time, quantity with unit, and relevant descriptive features. Keep each sample in one row. Use “not recorded” for missing data; use zero only when none was actually counted during the observation.

Modelled example: Construct Leaf ID | Length (cm) | Colour, then enter A | 7 | dark green and B | 5 | pale green. A blank length is not the same as a measured length of zero.

1. Instrument-reading circuit

Use labelled rulers, jugs and safe thermometers or the fixed models above. Students state quantity, unit and interval, then record a reading. Ask a partner to check the start point and explain a rounded value.

Checkpoint: A 20-to-30 scale has five equal spaces. Expect “two per space”. If a learner says one, return to the labelled difference before moving on.

2. Observe, identify and record

Provide a teacher-selected wildlife image, clip or call and a suitable reference. Students construct an organiser: source/time/place → feature seen or heard → possible identification → what remains uncertain. A direct safe observation is an alternative.

Look for: a source-based record and honest uncertainty. Reteach if an inferred animal is reported as directly seen or if repeated calls are treated as separate animals.

3. Observation upgrade

Retain the useful measured statement “temperature rose from 22°C to 33°C” when those readings were actually taken. Rewrite vague notes into specific descriptions without inventing numbers. Make a table with Time (min), Temperature (°C) and Appearance, using each real reading immediately.

Teacher action: Show a blank cell and a recorded zero. Students explain why they are different before collecting their own results.
Questions and answersWith answers

Important questions and answers

  • How do I find a scale interval? Subtract the two labelled values and divide by the number of equal spaces between them.
  • Why read a jug at eye level? Looking from above or below can make the level appear at the wrong mark; place the jug level first.
  • Why use number and unit? A measured value such as 45 is unclear without mm, cm or another correct unit. Counts should say what was counted.
  • Does a digital display guarantee accuracy? No. Check units, zero/setup and where the sensor is placed.
  • How should I identify an animal? Compare observed features or calls with a reference, state how evidence was obtained and retain uncertainty when needed.
Practice and reviewReady for practice

Assessment-style questions and review hints

  • A ruler endpoint lies between 8 cm and 9 cm, closer to 9 cm. Record to the nearest centimetre. Answer: About 9 cm. Review: Find the nearer mark and keep the unit.
  • A record says “leaf B, 12” with no heading. Improve it without inventing data. Answer: Confirm the measured quantity/unit from the method before labelling it; do not guess cm or mm.
  • Construct headings for observing two seedlings every morning. Expected: Date/time, Seedling ID, Height (cm) and a relevant appearance column.

Exit ticket

Read one scale model, state its interval and record the value with unit. Then write one observation and one possible interpretation from a safe animal image or call. Mastery evidence: Correct interval and reading, an identifiable record, and a clear evidence/inference distinction. If these are missing, revisit the matching worked model before Test.

Common misconceptions and corrections

  • Every mark is one unit. Work out the labelled difference and the number of spaces.
  • A ruler starts at its physical edge. Use the zero mark; subtract a nonzero starting reading.
  • Extra digits make a coarse reading accurate. Match the recorded detail to the scale and rounding instruction.
  • A likely animal identification is certain. Describe the feature or call and say when more evidence is needed.
  • Zero and no record are identical. A zero is an observed count of none; missing data need their own label.

Support, Core and Extend

  • Support: Start with fully labelled scales and an organiser with headings; use teacher-provided images instead of fieldwork.
  • Core: Read equal intervals, round as instructed, choose a suitable tool and construct a labelled record.
  • Extend: Compare coarse and fine scales and explain uncertainty in an identification using the same Year 4 ideas.

Year 4 boundary: Use familiar scaled instruments and simple units. Formal error calculations, significant figures, averages and animal-trapping procedures are not required.

Curriculum alignmentStart here

Students follow ordered methods, distinguish qualitative and quantitative observations, read scales from their intervals, record units and use digital tools where they improve timing, measurement or organisation.

Learning routine: Observe → Model → Investigate → Record → Explain → Evaluate

Success looks like

  • Follow procedures
  • Read scaled instruments
  • Record units and observations
  • Use digital tools purposefully
  • Check precision and plausibility
Teach & ExplainTeaching slides and samples

Teach this topic step by step

Explore optional teaching slide packs for classroom lessons and explanations at home.

Browse Teach & Explain · Browse Print & Go

Teachers: follow SkillrHub on TPT, then email us to request a free sample before buying. Include the year, subject and topic or curriculum code.

Request a free sample

After trying the sample, honest feedback is welcome. A TPT review is optional, where available, and does not need to be positive.