Year 4 Mathematics · AC9M4M04

Estimate and compare angles

Use angle names including acute, obtuse, straight, reflex and revolution, and recognise their relationship to a right angle

Ready to project and teach

Learning goalsSay it simply

Learning intention: Estimate and compare angles by the amount of turn, use the names acute, right, obtuse, straight, reflex and revolution, and explain each using a right angle as a benchmark.

An angle is an opening between two arms that meet at a vertex. It can also describe a turn from a starting arm to a finishing arm. The marked arc or arrow tells us which angle or turn to consider. Two arms can show a small opening and a larger opening around the other side.

Learning routine: Find the vertex and marked arc → compare with a square corner → compare with a half turn or full turn when needed → name and explain the angle.

Success looks like

  • I compare an opening with one, two or four right angles and give a sensible estimate.
  • I name and compare marked interior angles and angles in my surroundings.
  • I physically make and use a right-angle template, matching its corner and one edge to the angle.
  • I use a straightedge, set square or spirit level for the relationship it can check, and record what I observed.
  • I explain why turning a diagram or lengthening its arms does not change its angle.
Clean visual examplesWorked models

Clean one-page examples

AC9M4M04 - Estimate and compare angles
Worked models

1. Build the turn benchmarks

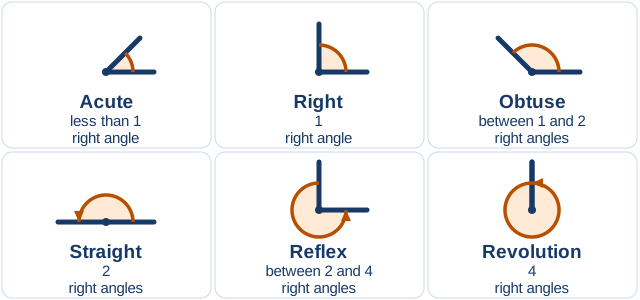
Six marked examples: acute, right, obtuse, straight, reflex and a complete revolution. Every example has a visible orange arc or arrow.
A right angle is the reference. Straight is two right angles; revolution is four. Obtuse lies between one and two, and reflex lies between two and four.
  1. Hold a square corner beside an angle. One square-corner turn is one right angle.
  2. Place two right-angle turns end to end in the same direction. The arms finish opposite each other: a straight angle.
  3. Continue through four right-angle turns. The arm returns to its starting direction: a revolution.
  4. Compare an unmeasured opening. About halfway between one and two right angles is about one and a half right angles and is obtuse.

Teacher says: “I am estimating the turn, so I do not need a degree number. I first decide which benchmarks surround it.”

Checkpoint: An opening is about half of a square corner. Answer: about half a right angle; acute. If a student says right because one arm is upright, rotate the diagram and compare the opening again.

2. Look inside the shape

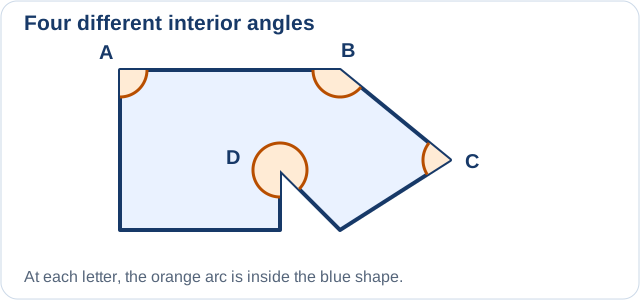
One shaded, straight-sided shape has orange interior arcs at A, B, C and D. D is an inward corner; its long arc is inside the shaded region.
Worked classification: A is right, B is obtuse, C is acute and D is reflex. D’s small unshaded gap is outside the shape.
  1. Find the marked vertex and the two sides meeting there.
  2. Follow the orange arc within the shaded inside, rather than the smaller outside gap.
  3. At A, a square corner fits exactly. B opens wider than one right angle but less than two. C opens less than one. D opens through more than two and less than four.

Answer: A right, B obtuse, C acute, D reflex. No rule about adding all the angles is needed.

3. Make and use a right-angle template

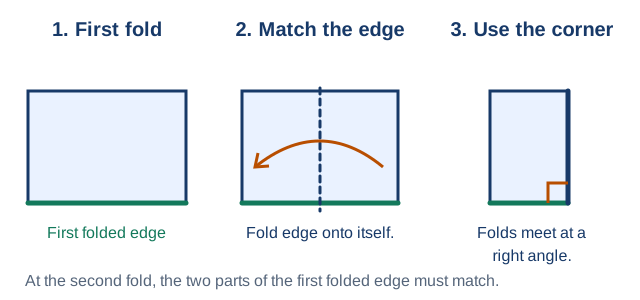
A three-stage paper model shows a first folded edge, a second fold matching that edge onto itself, and the right-angle corner where the folds meet.
The second fold must bring the first folded edge exactly onto itself. Any two arbitrary folds will not necessarily make a right-angle template.
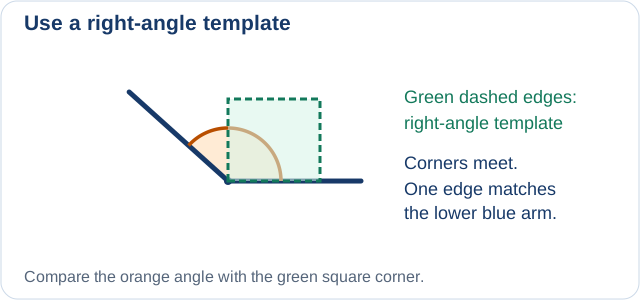
A green template shares its lower-left corner and lower edge with the angle vertex and horizontal arm. The second blue arm points upper left.
The corner and one edge match. The second arm opens beyond the other template edge, so the marked angle is greater than one right angle. It is still less than a straight angle, so it is obtuse.
  1. Fold a piece of paper once, making a straight folded edge.
  2. Fold again so that the first folded edge lies exactly on itself. Press the fold; the corner where the folds meet is a right angle.
  3. Alternatively, trace a checked square corner onto cardboard and cut it out with adult help.
  4. Estimate the intended angle before checking. Put the template’s corner at the angle’s vertex and one edge along one arm. Rotate the template as needed.
  5. Follow the marked arc. For an opening up to a half turn, the second arm inside the square-corner opening means smaller; matching the other edge means equal; opening beyond it means greater. For a turn greater than a right angle, check the straight-angle and full-turn benchmarks to decide whether it is obtuse, straight, reflex or a revolution. Do not replace a marked long turn with its smaller gap.

Model record: “Opened card: I estimated obtuse. I matched the template corner and one edge. The other arm opened beyond the second edge, but not as far as a half turn. My check is greater than one right angle and less than two: obtuse.”

Checkpoint: A student holds the template near an angle without matching the corners. Answer and fix: the comparison is not ready; match the vertex and one arm first.

4. Choose and use the right tool

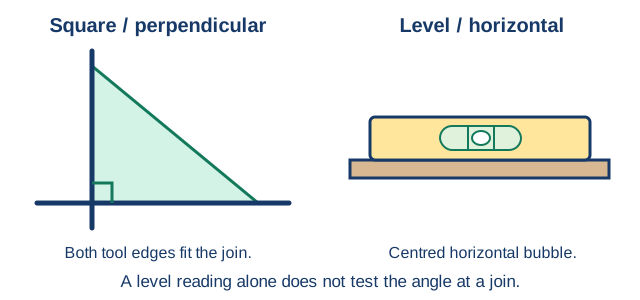
A set square has both edges at its square corner aligned to two intersecting lines. A separate spirit level rests on a shelf with its horizontal bubble centred.
Left: the lines are perpendicular. Right: the shelf is level in the checked direction. The level reading alone says nothing about an unchecked side support.

Straightedge: place its straight edge along a drawn line and check the whole part for any bend away from the edge.

Set square: put the square corner at a join. Align one adjacent edge to one line and check whether the other edge fits the second line. If both fit, the lines are perpendicular. Only one matching edge is insufficient.

Spirit level: with an adult, put the measuring face on a safe reachable shelf or tabletop. Use the horizontal vial to check level in the chosen direction; a bubble centred between the marks indicates level. Use a suitable vertical vial when checking an upright object. A bubble reading alone does not establish an angle between arbitrary lines or prove that every edge of an object is straight.

Worked question: “The shelf is level. Is its unchecked side support perpendicular to it?” Answer: we cannot conclude that from the shelf reading. Use a set square at the join and check both directions.

5. Turn the diagram, keep the opening

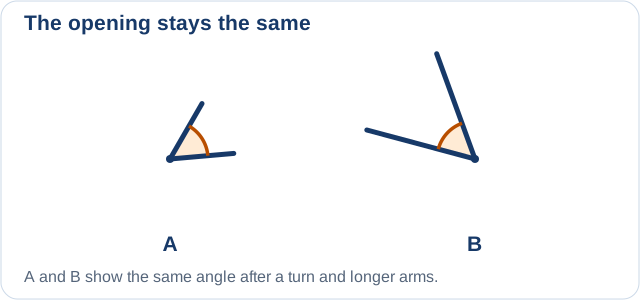
A has short arms. B has long arms in another orientation; the marked opening is a traced copy of A.
Tracing, turning and extending the arms preserves the opening. A and B are the same size.

Trace an acute opening onto paper, turn the trace, then extend both arms. Match the vertices and one arm again. The other arms still align, so the opening is equal. Longer arms and a new orientation do not make a larger angle.

Curriculum examplesAll four elaborations

Content description: estimate and compare angles using angle names including acute, obtuse, straight angle, reflex and revolution, and recognise their relationship to a right angle

E1: classifying the interior angles of a range of shapes, using examples of angles to identify acute, obtuse, right and reflex angles

Teach and model: Shade the inside of a triangle, rectangle and shape with an inward corner. Compare each marked interior opening with a right-angle template. Use the four labelled angles in the worked model: A right, B obtuse, C acute, D reflex. At D, explicitly trace the longer arc within the shaded shape.

Student evidence: Draw a closed shape with an inward corner, shade its inside and mark a reflex interior angle. Accept other valid concave shapes; the reflex angle need not be exactly three right angles.

Question and answer: “Can an interior angle be reflex?” Yes. At an inward corner, the angle inside the shape can be greater than a straight angle and less than a full turn.

E2: identifying angles within the environment and estimating whether they are acute, obtuse right or reflex

Teach and model: Identify the two arms and the intended opening in a book-cover corner, partly opened card, door viewed from above or a turning pointer. Estimate first, then compare with a template where it can be placed on the same flat opening. A rectangular book-cover corner is right; an opened card can be acute, right or obtuse depending on how far it is opened.

Student evidence: Record a safe object, a marked sketch, an estimate and a checked comparison. Do not infer a precise angle from a slanted photograph of a corner. Choose a flat view or check the object directly.

Question and answer: “Are all door openings obtuse?” No. The angle changes as the door turns, and the marked turn must be specified.

E3: creating a right-angle template using cardboard or a double-folded piece of paper and using it to compare angles in the environment, commenting on whether they are smaller than or greater than a right angle

Teach and model: Follow the actual double-fold or checked-cardboard construction above. Demonstrate the two alignments: corner to vertex, one edge to one arm. Let students physically construct and test their templates on two safe flat angles.

Student evidence: Keep the constructed template and the before/after records. A successful check may confirm an estimate or lead to a sensible correction. Naming a tool in a multiple-choice question does not show that the student has created and used it.

Question and answer: “Does a template work on a tilted corner?” Yes. Rotate the template without changing its square-corner opening.

E4: using different measuring tools such as a spirit level or set squares to determine whether lines or objects are straight, square or perpendicular (at right angles)

Teach and model: Use a straightedge to test a drawn line for bending, a set square to test a square or perpendicular join, and an actual spirit level with its appropriate vial to test level or vertical alignment. Model how to place each tool and read the evidence.

Student evidence: A checked drawing of perpendicular lines, both set-square edges aligned, and a supervised spirit-level record with observed bubble position. The written conclusion must stay within what was checked.

Question and answer: “A bubble is centred on the shelf. Have we checked the angle at every corner?” No. The bubble shows level in the checked direction. A square-corner test must compare both directions at the relevant join.
Questions and answersWith answers

Important questions and answers

  1. How many right angles make a straight angle and a revolution? Two make a straight angle; four make a revolution.
  2. Is every angle greater than a right angle obtuse? No. Obtuse is greater than one but less than two right angles. A straight angle is two; a reflex angle is between two and four; a revolution is four.
  3. What does “about one and a half right angles” mean? About halfway between one right angle and a straight angle. It is obtuse.
  4. Can the same two arms show both an acute and a reflex angle? Yes. The small opening can be acute and the long opening around the other side reflex. Mark the intended arc.
  5. Why do arm lengths not determine angle size? They show how far the arms extend, not the amount of turn between their directions.
  6. How do I place a right-angle template? Match the corner to the vertex and one edge to one arm, then inspect the other arm.
  7. What does a centred horizontal spirit-level bubble tell us? The surface is level along the direction checked. It does not alone check an angle with another object.
  8. How do I check whether two lines are perpendicular? Fit the two edges next to a set square’s square corner to the lines at their meeting point. Both must align.
Guided learning activitiesDo and explain

1. Angle benchmark cards

Teacher does: show marked angle cards in varied orientations. Students do: sort them into acute, right, obtuse, straight, reflex and revolution, then justify each with right-angle turns. Include two different acute openings to show that sharing a name does not mean equal size.

Look for: students follow the marked arc and use the one, two and four right-angle boundaries. If incorrect: trace the intended opening and overlay a square-corner template before sorting again.

2. Turn and estimate

Use a paper arrow on a flat surface. Mark its start. Make one, two, three and four right-angle turns in the same direction; record the finish and draw the whole turn with an arrow.

Expected record: one right angle is a quarter turn; two make a straight angle; three make a reflex angle; four make a revolution. A pointer can finish in the same direction after a full turn as when it has not moved, so record the turn path.

3. Same angle, new position

Trace one acute angle, then rotate the trace and extend the arms. Compare the original and copy with their vertices and one arm aligned.

Expected answer: the other arms also align, so the openings are equal. If a student compares line lengths, cover the distant ends and focus on the turn.

4. Template and tool stations

Make a template and keep it for checking. At one station, estimate and compare two safe flat object angles. At a second, draw perpendicular lines using a set square and show both edges fitted. At an adult-led third station, use a spirit level and record the horizontal bubble reading. On each record, write what the evidence establishes.

Expected evidence: physical construction, marked sketches, before/after estimates, accurate placement and conclusions. A level record and a square-corner record answer different questions.

Practice and reviewReady for practice

Assessment-style questions and review hints

  1. A marked opening is less than one right angle. Name it. Acute. Review hint: compare the opening with a square corner.
  2. A marked turn is greater than a straight angle and less than a revolution. Name it. Reflex. Review hint: follow the long marked route, not a small gap.
  3. A pointer makes three right-angle turns. How much more makes one revolution? One more right-angle turn. Review hint: a complete turn has four quarters.
  4. A template is rotated to fit a corner and both edges match. What kind of angle is it? Right. Review hint: rotating the template does not change its opening.
  5. One set-square edge matches a line but the second edge misses the other line. Is that a perpendicular pair? No, provided the square corner is at the meeting point and the first edge is aligned. Review hint: both edges must fit.
  6. Draw and label an acute and a reflex angle with clear arcs and compare each with right angles. Accept any acute opening less than one right angle and any marked reflex opening greater than two and less than four. Review hint: two arms without arcs can leave the intended angle unclear.
  • “Long arms mean a larger angle.” Compare the opening at the vertex. Trace and turn equal openings with different arm lengths.
  • “A right angle must look like an upright L.” Rotate a square-corner template. Its angle remains right.
  • “The small gap is always the angle.” Follow the marked arc. At an inward shape corner, the interior reflex angle follows the larger opening inside the shape.
  • “Every angle greater than a right angle is obtuse.” Add the second boundary: obtuse is smaller than a straight angle.
  • “Every reflex angle is three right angles.” Three right angles is one reflex example; any angle between two and four right angles is reflex.
  • “Fold twice and any corner will be right.” On the second fold, bring the first folded edge exactly onto itself.
  • “A centred level bubble proves all joins are square.” A horizontal vial checks level in one direction. Use a set square at a join to check the two directions there.
  • “One aligned set-square edge proves perpendicularity.” Match the corner to the intersection and check both adjacent edges.

Support: begin with a physical square-corner template and clear acute, right and obtuse openings. Use large marked arcs and varied rotations. Ask “smaller, equal or greater?” before naming. Demonstrate folding and tool placement, then have the student repeat the action.

Core: name and compare all six angle types, mark interior and environmental angles, construct and use a template, and use appropriate straightedge/set-square/spirit-level checks. Require a short reason from the actual evidence.

Extend within Year 4: compare two different acute or obtuse openings, estimate midway between right-angle benchmarks, and construct a closed shape with a reflex interior angle. Explain a tool-choice error. Keep the focus on comparison and turns.

Exit ticketCheck evidence

Exit ticket

  1. Draw a straight angle and a revolution with marked turn arrows. Record right-angle counts. Expected: a half turn with opposite arms and two right angles; one complete turn with four. Reteach by moving a paper pointer through quarter turns if the drawings show only unmarked lines.
  2. Draw an obtuse angle and a reflex angle. Label and compare them with right angles. Expected: obtuse between one and two; reflex between two and four, with a long arc. If the reflex drawing marks only the small gap, trace the intended turn again.
  3. Show your constructed template on a chosen safe flat angle. Record estimate, placement and checked comparison. Expected: actual template, matched vertex and one edge, and a correct observation. If placement is wrong, reposition and repeat the check.
  4. Show a pair of perpendicular lines checked with a set square. Explain what a centred spirit-level bubble on a shelf would tell you. Expected: both set-square edges fit at the join; the horizontal vial shows level in the checked direction, not an untested join angle.

Mastery decision: look for accurate marked angles and comparisons, actual template construction/use, and correct tool placement and conclusions. Revisit the specific missing action or benchmark before moving to independent Test work.

Curriculum alignmentStart here

Content description: estimate and compare angles using angle names including acute, obtuse, straight angle, reflex and revolution, and recognise their relationship to a right angle

Materials and time: allow about two 30-minute sessions. Use pencil, separate drawing paper, paper for folding or cardboard, a checked square corner, a set square, a straightedge and an adult-supervised spirit level. Use reachable surfaces and arrange a class demonstration for a tool that is unavailable at home.

Prerequisites: recognise a square corner, identify a common vertex and follow quarter, half and full turns.

Year 4 boundary: the target is estimating, comparing and explaining angles using right-angle benchmarks, named types and turns. Exact degree measurement with a protractor and rules for sums of angles are not required here.

Learning flow: use this Topic Guide and its Classroom View, then complete the written Worksheet, Practice and Test. Practical items need the actual construction or tool record checked by an adult.

Teach & ExplainTeaching slides and samples

Teach this topic step by step

Explore optional teaching slide packs for classroom lessons and explanations at home.

Browse Teach & Explain · Browse Print & Go

Teachers: follow SkillrHub on TPT, then email us to request a free sample before buying. Include the year, subject and topic or curriculum code.

Request a free sample

After trying the sample, honest feedback is welcome. A TPT review is optional, where available, and does not need to be positive.